
Installing Pinterest Tag on Shopify is a relatively easy process. If you want to increase your website conversions related to Pinterest traffic, this is a highly valuable step.
For full disclosure, I did not come up with this information myself. I simply had a need to do it, looked up how to get it done and after doing it, realized that the instructions available online were not as thorough as I needed. The instructions I was able to find left some room for improvement and in this article, we are going to slightly improve on the steps provided by Pinterest themselves.
If you would like to view the original steps from Pinterest, take a look at the resource section at the end of this article.
Installing the Pinterest Tag on Shopify- A Step by Step Guide
Step 1: Install the Pinterest Base Code in Shopify
To install the base code, first copy the following code:
- From your Shopify admin, click Online Store, and then click Themes.
- Find the theme you want to edit, click Actions, and then click Edit Code (see Figure 1 below).
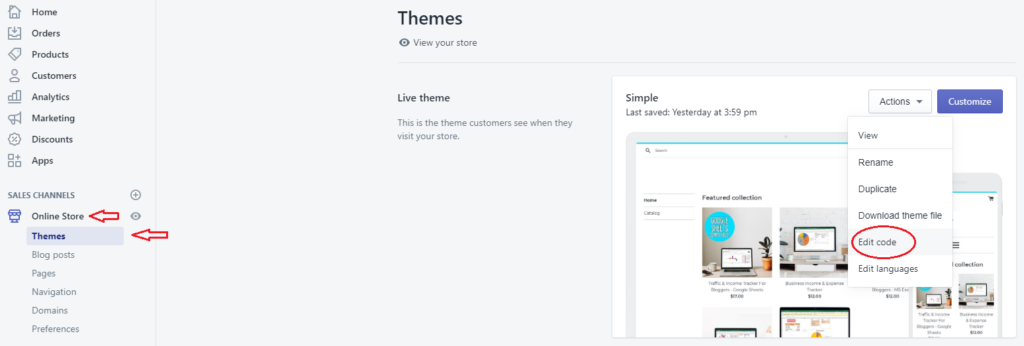 Figure 1: Click on Edit Code by first going to Online Store then Themes then Actions.
 - Click theme.liquid. For me, it was located under the Layout folder.
- Scroll until you see </head> and paste the code above it (see Figure 2 below).
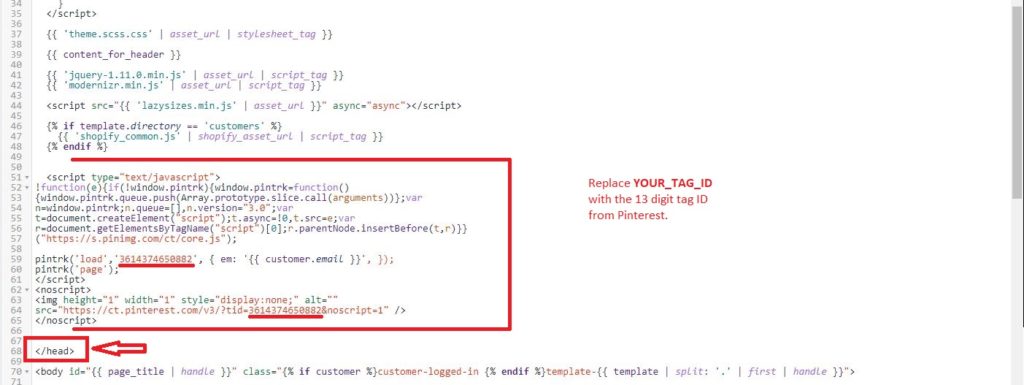 Figure 2: Paste the code above </head> as seen here.
 - Replace YOUR_TAG_ID with your own unique tag ID. You can find this unique tag ID by going to your Ads Manager in your Pinterest account:
- From Ads Manager: Ads > Conversion Tracking > Generate Pinterest Tag
- The unique tag ID will now be available in your conversion tracking overview and details section. Keep in mind, you only need to create one tag for your website.
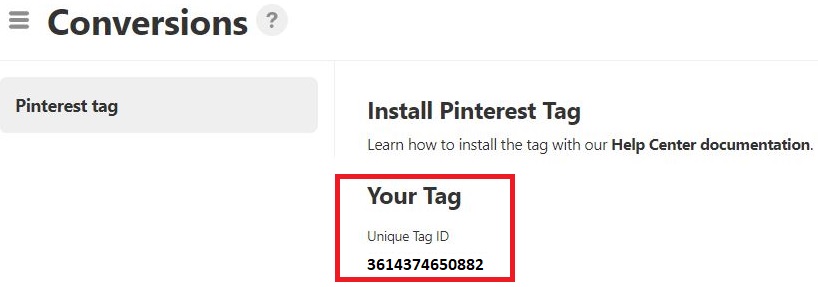 Figure 3: 13-digit Tag ID.
 - The 13-digit number below “Unique Tag ID” is your tag ID. Copy just the 13 digit number and paste it in place of YOUR_TAG_ID.
- Click save in the top right corner in Shopify.
Step 2: Install the Pinterest Checkout Code in Shopify
To install the Checkout code, copy the following code:
{% if first_time_accessed %}
{% endif %}
Code 2: This is the Checkout code to be installed in the Additional scripts text box in the Order processing section.
- From your Shopify admin, click Settings, and then click Checkout.
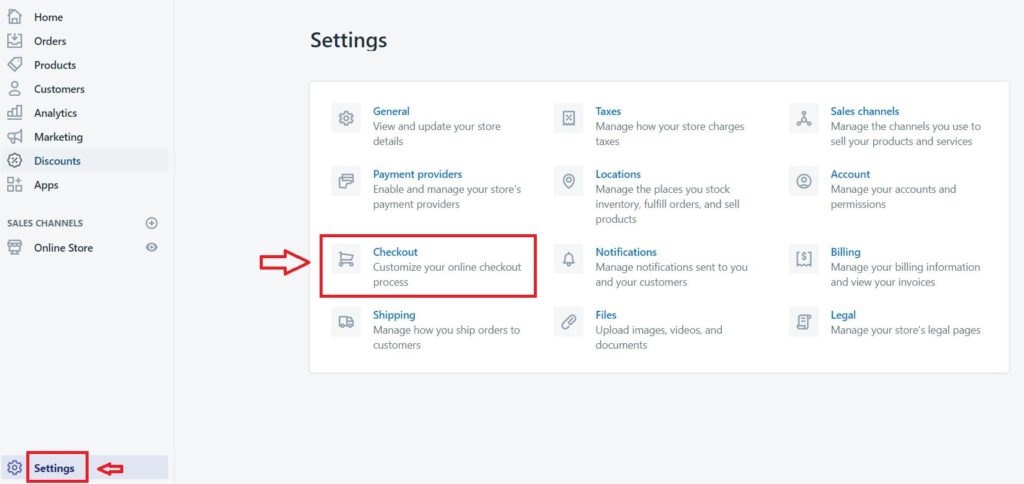 Figure 4: How to access Checkout in Shopify admin.
 - In the Order processing section, find the Additional scripts text box:
- Paste your tracking code into the Additional scripts text box. If there is already code in this box, paste your tracking code after it.
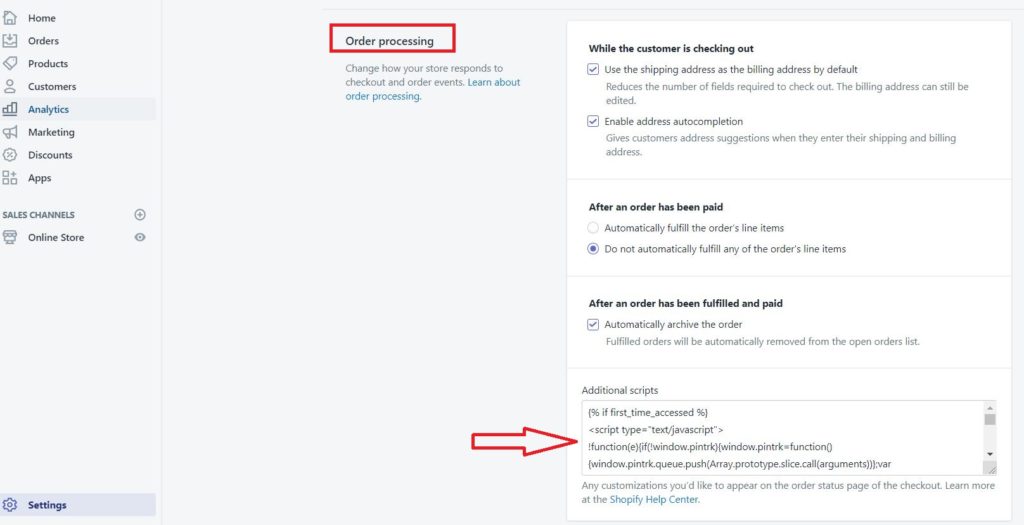
Figure 5: Input Additional scripts for order processing in Shopify in the text box with the red arrow. - Remember to replace YOUR_TAG_ID with the unique tag ID that was generated in Ads Manager.
Step 3: Install the Addtocart Code in Shopify
To install the Addtocart code, copy the following code:
onclick="pintrk('track', 'addtocart', {value: {{product.selected_variant.price | money_without_currency}},order_quantity: 1});"
Code 3: This is the Addtocart code to be copied and pasted within the ending caret of the <button> or <input> element (whichever applies to you).
- From your Shopify admin, click Online Store, then Themes.
- In the current theme you’re using, click Actions > Edit code (see Figure 1 above for illustration).
- Under Templates, look for code files named liquid, product-templated.liquid, or product-form.liqud and open it. [This may vary depending on the theme you have installed, but it’s most common to see add to cart button code in the products.liquid file or equivalent].
Note: For me, I was able to get product-template.liquid by doing the following:- Under Templates, I saw product.liquid however, when I clicked on it, I received the following message as you can see below:
“The contents of the product.liquid template can be found in /sections/product-template.liquid”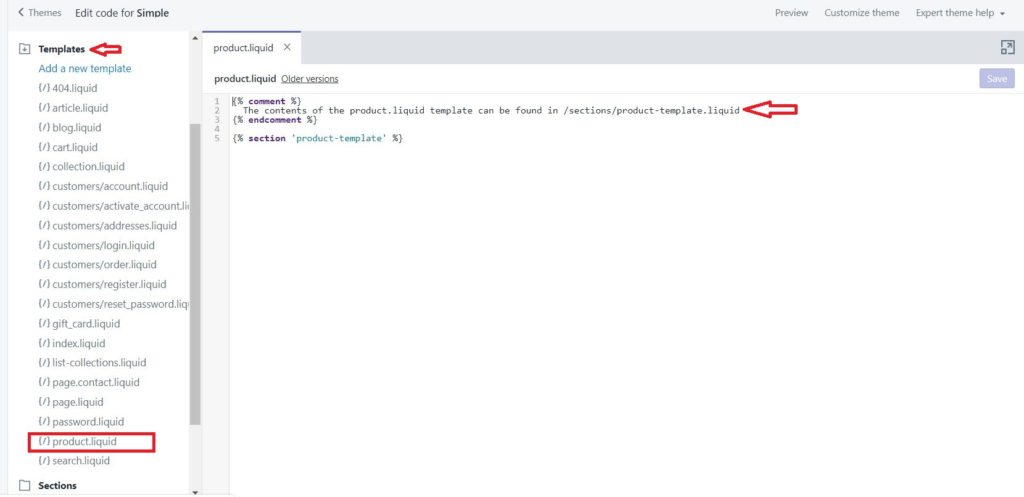
- So, I then went to Sections and clicked on product-template.liquid and proceeded to step 4 below.
- Under Templates, I saw product.liquid however, when I clicked on it, I received the following message as you can see below:
- Search the file (Ctrl+F) for “addtocart” (use command+F on Mac). You are looking for this line of code:
 Figure 6: The button code to look for before inserting Code 3 above.
 Figure 7: Closer look at the ending of the button code to see the ending caret. Notice that the code starts with “<button” and ends with “>”
 - Copy Code 3 and place within the ending caret of the <button> or <input> element:
 Figure 8: Insert Code 3 after the last quote before the caret (>) as seen above.
 - Click save in the top right corner.
NOTE: The addtocart event will fire both when a user clicks the addtocart button on the page and the viewcart button that it turns into. That’s OK because Pinterest will dedupe identical events within 60 seconds of each other.
That’s all folks! Its as easy as that. Below are some benefits that come with installing a Pinterest tag on your e-commerce store.
Some Benefits of Pinterest Tag Tracking
- Know which promoted pins are converting the best on Pinterest.
- Ability to target new customers that are better converting when using promoted pins.
- Ability to retarget Pinterest visitors that abandoned cart.
- Ability to retarget those visitors who frequent your shop but may not be converting for some reason.
Resource:
https://help.pinterest.com/en/business/article/shopify-and-pinterest-tag